Wednesday, 27 February 2013

3D Conversion Tests -Depth Mapping


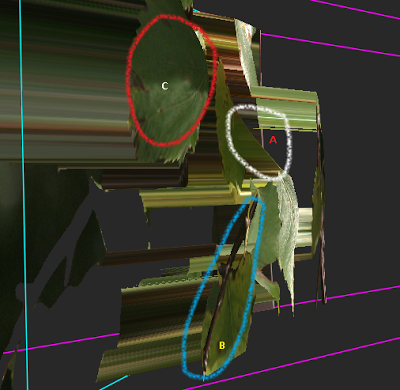
Image shows a still from the depth mapped conversion: source material is a Sony EX1 shot,
the finished clip is shown below:

Anaglyph clip of finished conversion

The shot below shows how the leaf stalk "A" is leaning back
in Z space, as it really does, likewise, the branch "B" has had a similar treatment.
Leaf "C" has had convex distortion centred on it to give the leaf a Z space bulge, imitating it's natural shape on the tree.


Saturday, 23 February 2013

FOR PC and NVIDIA USERS


Ever wondered why nothing ever looks right on you PC or Laptop? Everything you use to play media on messes with your set ups, just like that new 60inch screen you took delivery of last week - looks like hell until you turn off all the "auto" settings and align the monitor to deliver an acceptable image from a known source - something you shot, edited and know intimately.

So far so good - look at the video controls available for windoze media player, or VLC or anything else - you can tweak them, but they often get dumped when you change media or when you restart your system - not too helpful.

1) Make a nice mp4 HD file of something you know well - this will play in almost everything, especially if you encode using "Main" profile and not "High" This will stop good old Quicktime Player from freekin out. Use a high data rate like 15mbs. You can also download my two set-up files below if you prefer.

2) Right click on your Laptop or PC monitor and access the NVidia Control Panel, select video at the bottom, and "Adjust Video Colour Settings" Now take control of your system and answer the question "How do you make colour adjustments" answer: "With the Nvidia Settings! This will enable YOU to decide what your media player windows look like and not some random application.

set up as shown here:


 These are settings for my Sony Vaio, it stops burn-out and excessive contrast, setting the dynamic range to 0-255 forces the player to show correct black levels as well as unclipped peaks.


Newer NVidia Drivers will display the above options - make sure these are un-ticked.

Now you are in control, set your screen to provide exactly the viewing parameters you need - making it possible to use your laptop as a basic reference - it will never be perfect, but this may help.

If you use Power DVD player, make sure you turn on Nvidia hardware Acceleration which will turn off all the pre-set visual excitement available from Cyberlink, and will render your images to your personal setting.

Use My Files Here:

Black Level Set-Up File

Start with this this black level file, it has 0% black, 5% and 10% with a centre 3% chip. Make sure you can just see the centre 3% chip - and I mean JUST. Start with the controls set to 50% then reduce the brightness one notch at a time and update each time, then play - this is very sensitive -  you will find a point when the 3% chip vanishes, just add one and you are ready to adjust the contrast. 

Peak White Set-up File

Now open this  Peak White set up file, after downloading it. It has a 100% white background, a 98%, 95% and 90% chip. View this file on your media player - can you see all 3 areas? the 98% will just show against the 100% background when correctly set - if not, reduce the contrast setting in your Nvidia Contol Panel in 1% increments until you see the 3 areas - remember to "apply" each change, then play the file (have both windows open at the same time) this will update the player settings each time. This is super sensitive, you really only need to detect the centre 98% chip

Once set, you should be fully aligned and ready to play your files with pretty accurate results.

Oh, here's a Pluge file to identify whether or not your monitor is showing 0-255 or not.
It consists of horizontal bars from bottom to top showing 235-254 and a 254 chip in the centre, it looks like this:


235-255 Pluge File

Monday, 18 February 2013

IDE to AHCI in Windows without re-install


I came across this issue the other day, having run a new install on a caddy drive of win 7 64bit - I discovered that my Bios settings were marked as IDE for all drive ports, including the external eSata - this is really dull - speeds are hugely reduced, plus you don't get "Hot Swap" capability with external drive bays thru' the eSata port unless you are running in AHCI mode - you have to make sure AHCI mode is set in the system bios befeore you install windows or you're buggered - you need to set the bios correctly and re install - very tedious - except...


There is a way to safely enable AHCI mode. Be very careful in the 
registry, failure to do this right, or damaging other registry keys
can and will terminate your system for good -
BEWARE - I accept NO responsibility if you screw up.

1. Start, type "Regedit" in search box.
2. Open HKEY_LOCAL_MACHINE / SYSTEM / CurrentControlset / Services
3. Open msahci 
4. In the right field left click on "start" and select Modify 
5. In the value Data field enter "0" and click "OK" (you may have a 3 as the value here)
6. exit "Regedit" 
7. Reboot your computer and enter BIOS (hold "Delete" key while Booting)

8. In your BIOS select "Integrated Peripherals" , Now change SATA Mode from IDE to AHCI not forgetting eSata further down the list if you have it ,

9) Save and exit your bios - computer will re start - during post you will probably see the 
AHCI drivers load and list your drives.

Friday, 8 February 2013

Experimenting with 2D to 3D conversion

As the title says, I'm doing more experiments with converting 2D to 3D - er why? I hear you ask - well it's truly simple - I'm in the process of collecting footage for a short film about Dartmoor - a wild and beautiful region in the south west of England.

This is intended as a 3D production, but I have a problem: for those serious close ups of plants, flowers and details like this:


.... I need a 3D rig, capable of shooting with a very narrow IO ( interocular - the distance between the cameras eyes )  As this production is self funded, I do not have the necessary  to splash out on a mirror rig and the all important preview hardware to make this possible, and, climbing rocks with complicated set-ups, requires an assistant - well, most these outings are in pouring rain, snow and fog - my only companion being "Molly" the yellow labrador.

So, I'm looking for a software solution that will allow me to track a 2D camera move of a macro shot taken with my EX1 or 5D and then solve the move in 3D space. This then enables a depth map to be generated which positions the contents of the shot in 3D space. I've used a few "cod" pieces of conversion software - results are appalling, I need something like Nukex or PFDepth to get serious Hollywood results. 

Here's my first rough test:

2D to 3D Test

and another one:

Garden Leaves

and here's the shot of the daisy after creating about twelve tracked depth maps, and setting relevant positions in Z-Space - movements are very subtle, as it was a quiet sunny day when I shot this..

The Daisy macro

Hazel Tree leaves from Sony EX1 - 2D to 3D

These results are a great improvement on the earlier test shown a few posts down